Account Management
I did not receive the verification email.
Check your Spam/Junk folder. If you did not receive the email, please contact us.
How do I create an organization account?
Please follow the steps below:
-
- Sign up for Garuda Plex.
- Verify your email address via the link provided in the verification email sent to your mail inbox.
- Complete the form on the Sign Up page to create your organization account.

How do I add new users to my company account?
- Click Manage my company after logging in to Garuda Plex.

- Under the Company Users section, click +New User.

- Fill in all the required fields on the form and click Submit. You can set a user as a company admin by checking the option ‘Set this user as company admin’.

- New user will appear in the Company Users section.

How many users can I add to my company account?
The total number of users that you can add to your company account is as follows:
Garuda Plex Free Tier: 5 users
Garuda Plex Lite Tier: 50 users
Garuda Plex Pro Tier: 500 users
How do I remove users from my company account?
-
- Click Manage my company after logging in to Garuda Plex.
- Click on a user that you wish to remove in the Company Users section.

- Click Delete and confirm to remove the selected user.

How do I restore deleted users?
-
- Click Manage my company after logging in to Garuda Plex.
- Click View Deleted Users in the Company Users section.

- Click the blue Restore button to view the information of the user.

- Click Restore and the user will appear in the Company Users section.

I forgot my username.
-
- Click on Reset your password on the login page.
- Enter your email address and click SUBMIT.
- Your username will be emailed to you together with a link to reset your password. If you do not wish to change your password, you can disregard the link.

I forgot my password.
-
- Click Reset your password on the login page.
- Enter your email address and click Submit.
- A password reset link will be sent to you in an email. Please follow the instructions in the email to reset your password.

What is counted towards the managed storage of Garuda Plex account?
- Images
- Map layer data (KML)
- Flight log records
- Map/3D model processed
What can I do to protect my Garuda Plex account?
-
- Use a strong password with a combination of letters, numerals, and special characters.
- Do not share your login details with anyone.
- Change your password regularly.
- Log out after using Garuda Plex on shared devices to prevent others from gaining access to your account.
Do I need to provide my credit card details for Garuda Plex Free Tier account?
No. Your credit card details are not required to sign up for a Garuda Plex Free Tier account. The Free Tier account is totally free with up to 500MB total managed storage per account and up to 5 company users.
Why do I have to enter my credit card details for a Plex trial account?
We require a valid payment method to begin your trial offer. This allows seamless payment processing when you decide to remain on Garuda Plex Lite or upgrade to Garuda Plex Pro after the trial period ends.
Your credit card will not be charged if you terminate your subscription before the trial period ends.
How do I change my subscription plan?
You can change your Garuda Plex subscription plan among Garuda Plex Free Tier, Garuda Plex Lite Tier and Garuda Plex Pro Tier at any time with the following steps:
-
- In Manage my company, select Account.
- Click Change Plan to select a plan that you would like to subscribe. Select a plan (e.g. Garuda Plex Pro – Annual) and agree with the terms and conditions before submitting.


- You can also view your transaction history in Account.
Note:
A subscription plan change from Garuda Plex Lite to Garuda Plex Pro will take effect immediately.
A subscription plan change from Garuda Plex Pro to Garuda Plex Lite will take effect at the start of your next billing cycle.
A subscription plan change from Garuda Plex Pro / Garuda Plex Lite to Garuda Plex Free Tier will take effect at the start of your next billing cycle.
Please contact us if you require assistance.
How to top up for additional storage in Garuda Plex account?
Additional storage is available to Garuda Plex Pro Tier account @ S$ 60/TB monthly. You can subscribe for additional storage under Change Plan under Account. (This option is only visible in a Garuda Plex Pro Tier account.)
For Garuda Plex Free Tier and Lite Tier account users, you can attain additional storage by upgrading your subscription plans. See Garuda Plex Pricing page for more details.
How do I update my billing information?
-
- In Manage my company, select Account.
- For non-subscribers, you can click Add Credit Card to add your payment information.


- For existing Garuda Plex subscribers, click Change Credit Card to change your payment information.


- Enter your new billing information and click Submit.
Why was my payment declined?
If your card payment was declined, please check that:
- You have sufficient funds in the bank account linked to your credit/debit card.
- You have entered your credit/debit card number and CVV/CVC code correctly.
- Your credit/debit card is enabled for online transactions.
- Your credit/debit card is active and not expired.
Project Planning
How do I plan a drone operation using Garuda Plex?
Garuda Plex provides a holistic project planning tool for any of your drone operations. You can plan it by following the steps below:
- Go to the Projects page via the Projects Tab at the top of Garuda Plex. Click New > + Empty Project.

- Fill in the required fields and choose a project type.

- Click Create Project.
- Create your Targets, Obstacles and Notes in the area of interest. All features are auto-saved.

How do I edit my projects?
You can make changes to your saved projects at any point in time with the following steps:
- In Projects, select a project and click Edit > Edit Project Summary.

- You can edit the details of your project. Click Update Project when you are done editing.

- To edit/add Targets, Obstacles or Notes in the project, click Planner.

- To add Target/Obstacle/Note/Map Layer/GCP, click on the respective icons in the left panel. All features are auto-saved. To edit the title and description of the existing Targets, Obstacles or Notes, select it from the right panel.

Drone Deployment
How do I set up a drone operation?
- Click the Airplane logo in the top right corner of Garuda Plex to access the Drone Operations page. You will see 5 main objects (Drones, Batteries, Cameras, Deployments and Pilots/Flights). We recommend that you set up each object by adding any available information that you have before flying.

- Go to the Drones page by clicking the Drones icon. Click +New Drone to open the form to register your drone into Garuda Plex. Fill in the details and click Submit.


- Go to the Batteries page by clicking the Batteries Tab. Click +New Battery to open the form to register your battery into Garuda Plex. Fill in the details and click Submit.


- Go to the Cameras page by clicking the Cameras Tab. Click +New Camera to open the form to register your camera into Garuda Plex. Fill in the details and click Submit.


How do I set up my deployment after the project planning is done?
After planning a project, the next step will be setting up the deployment.
- Click the Airplane icon in the top right corner of Garuda Plex.
- Go to the Deployments page by clicking the Deployments icon, then click +Deployment Plan.

- . Follow the steps to provide the deployment details.

- You will then be redirected to your deployment page whereby the deployment details will be displayed in the left panel as shown in the picture below. You can then perform the following tasks:
- Add/Edit Flight Plan
- Edit Deployment
- Assess Risk
- Buy Insurance
- Apply Permit
- Update Status
- Download Target Polygon (for flight path planning)

- The deployment will be displayed in the Drone Operations page under Upcoming Deployments if it is within the next one month. We recommend that you update the status of the deployment after each flight.
- You can update the flight record of each pilot in the Pilots/Flights page after each flight.
How do I set up my deployment after the project planning is done? (NEW)
After planning a project, the next step will be setting up the deployment.
-
-
-
-
- Click the Airplane icon in the top right corner of Garuda Plex.
- Go to the Deployments page by clicking the Deployments icon, then click +Deployment Plan.
- Select your Project, Purpose and Deployment Date(s)
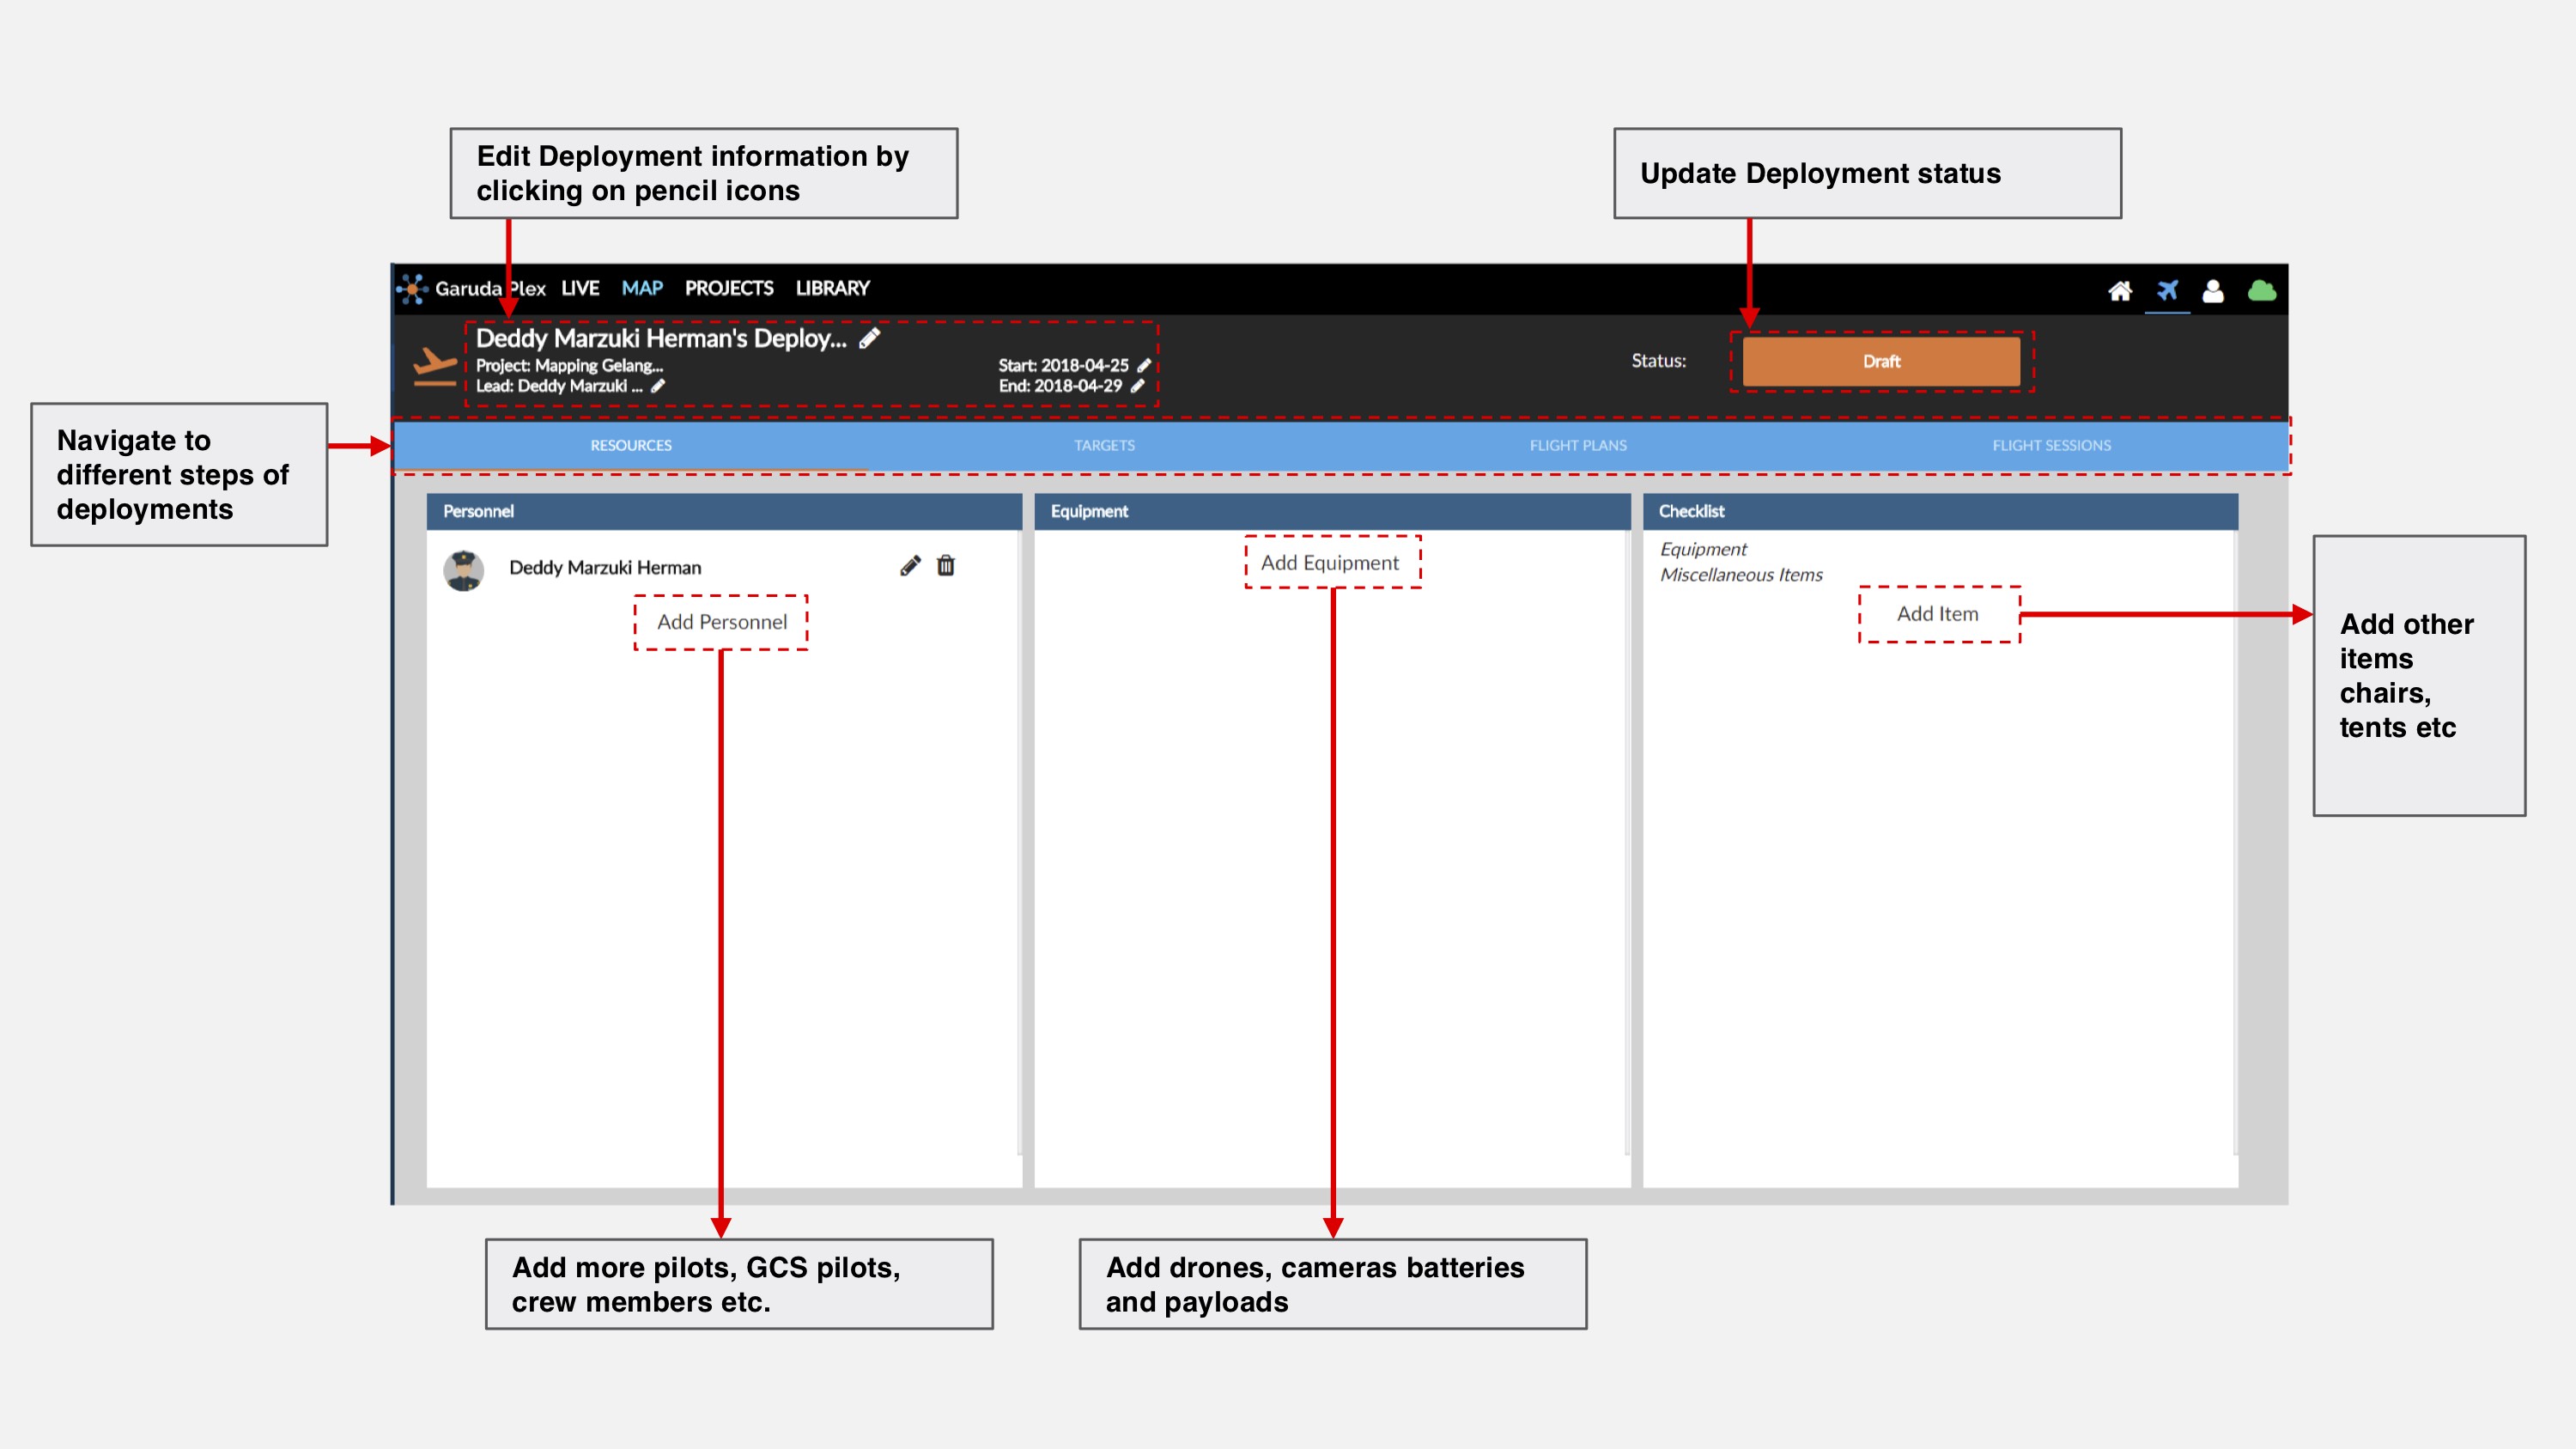
- You will be directed to the RESOURCES page of Deployment Planner as shown in the picture above. You can perform the following tasks:
- Edit deployment information
- Add and book pilots or crew members
- Add equipment (e.g. drones, cameras, batteries, payloads etc.)
- Add other miscellaneous items for deployment (e.g. chairs, laptops, tents etc.)
- Update deployment status (Draft / Pending / Ready to Fly / Cancelled)
-
-
-

-
-
-
-
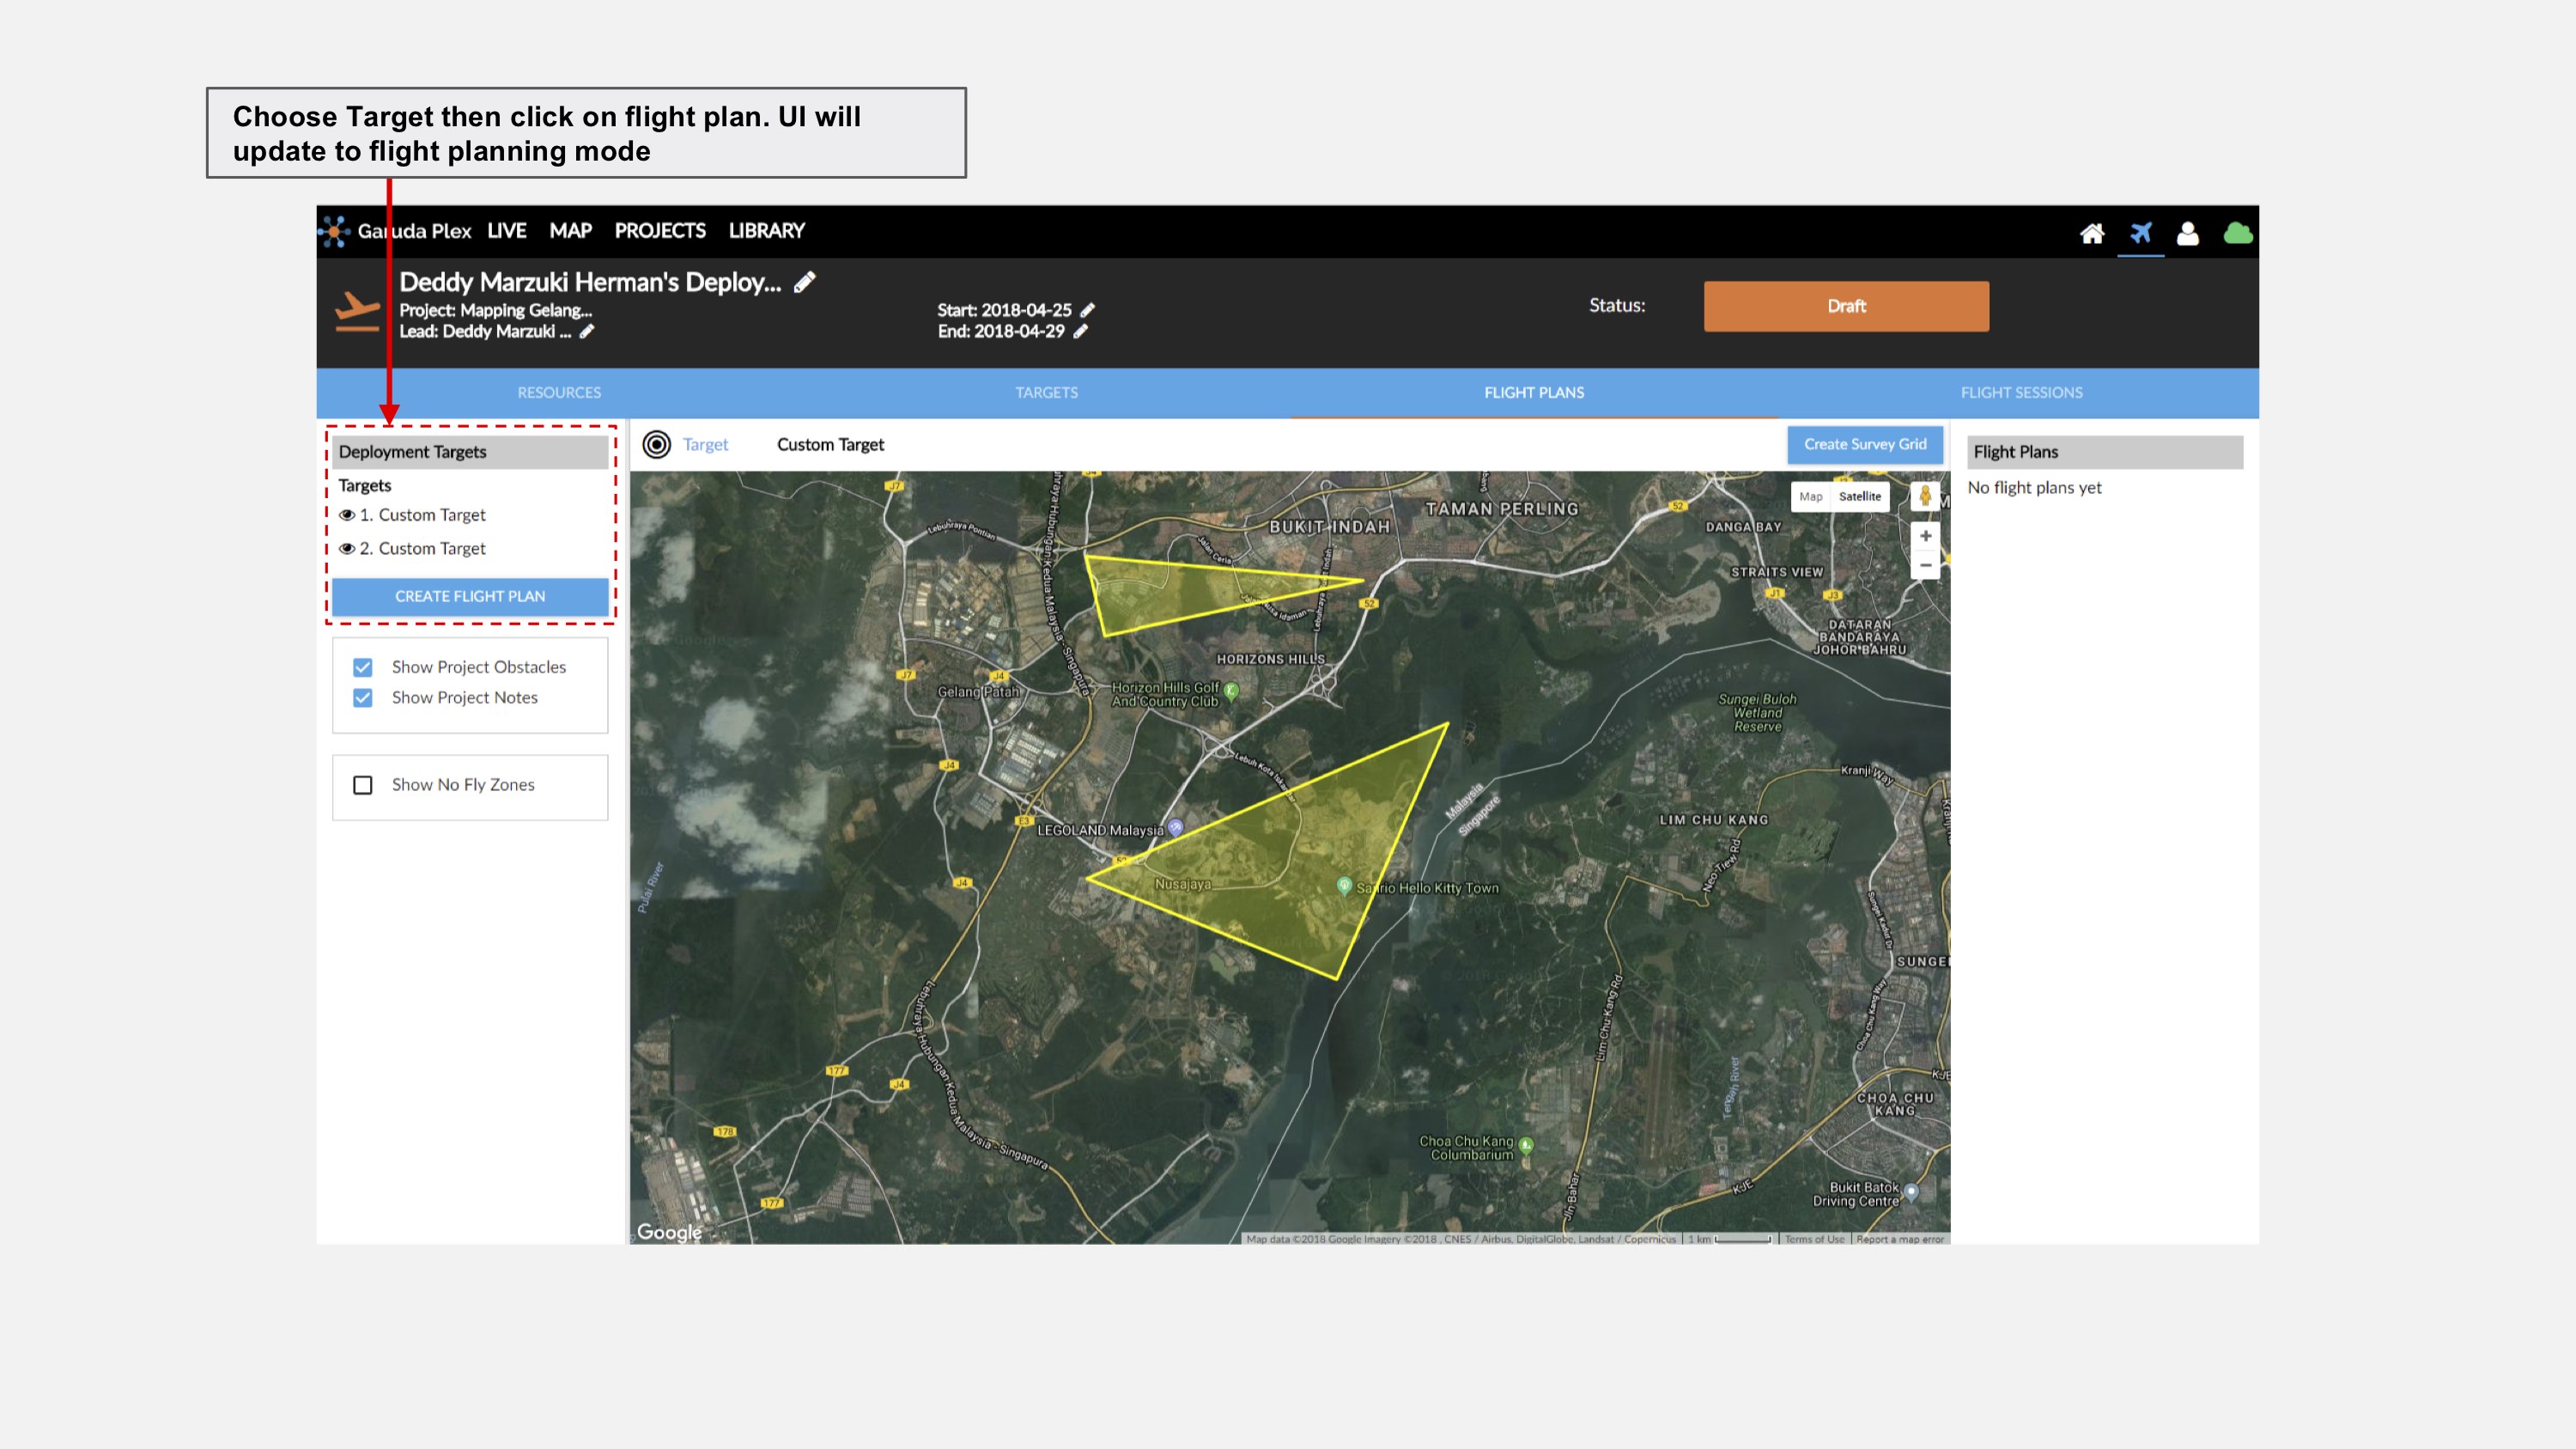
- Next, TARGETS page as shown in the picture above allows you to perform the following tasks:
- Convert the existing project targets to deployment targets
- Draw deployment targets (polygons) on map
- Show/Hide project information and no-fly-zone (NFZ) on map
- Download Target Polygon (for flight path planning)
- Next, TARGETS page as shown in the picture above allows you to perform the following tasks:
-
-
-
-
-
-
-
- Next, FLIGHT PLANS page as shown in the picture above allows you to create flight plan for a specific target.
-
-
-
-
-
-
-
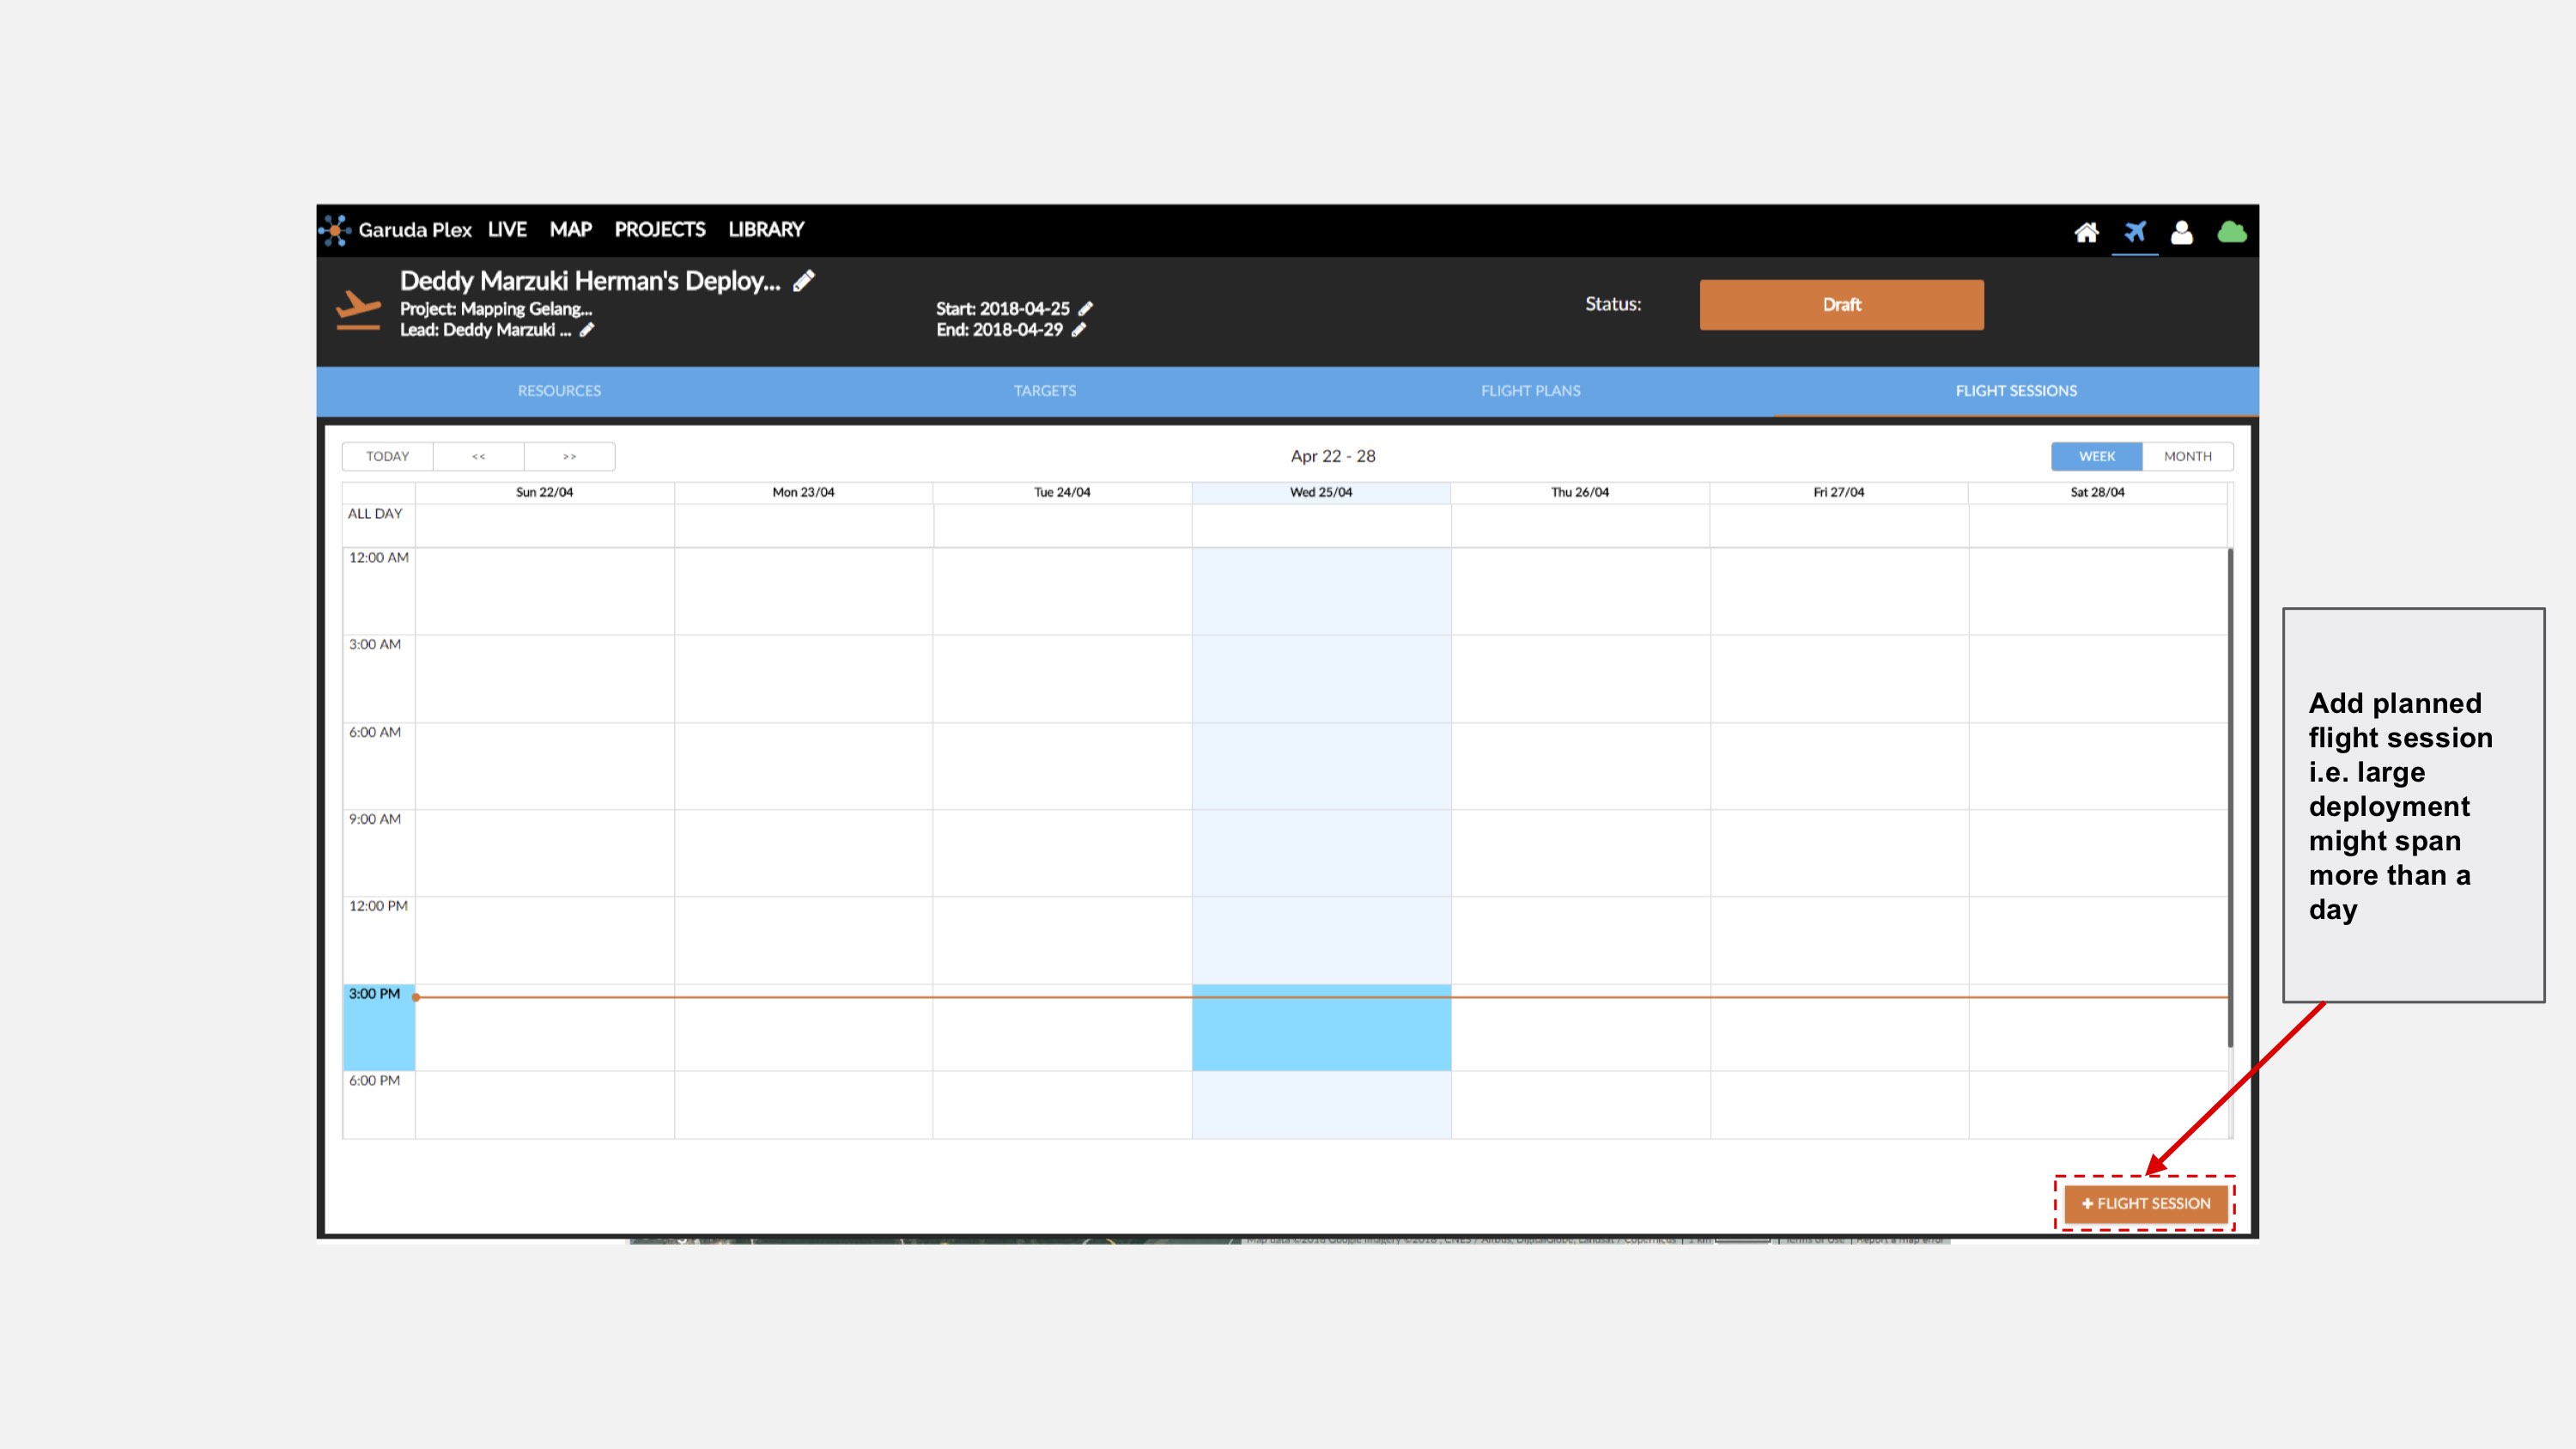
- Lastly, FLIGHT SESSIONS page as shown in the picture above allows you to add the flight session to deployment calendar
-
-
-
The deployment will then be displayed in the Drone Operations page under Upcoming Deployments if it is within the next one month.
How do I start my deployment after setting it up? (NEW)
In order to start the flight plan that has been created in the deployment , download Garuda Plex Mobile to connect to your drone.
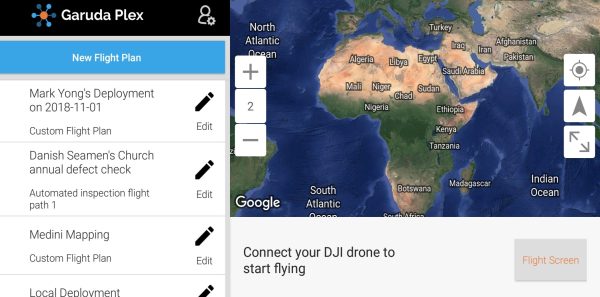
1. Once the application is launched, scroll the left panel and select your intended flight plan.
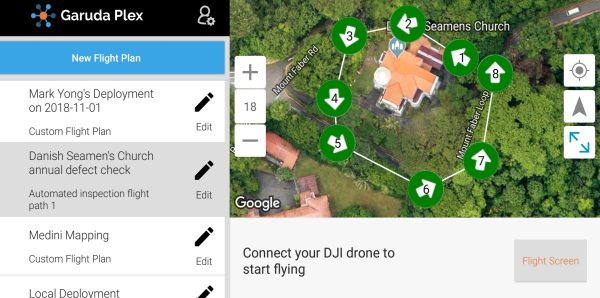
2. Make sure your selected flight plan is correct by checking the flight routes on the map view.
3. Click on the ‘Flight Screen’ button to enter flight mode once your selected flight routes are correct.
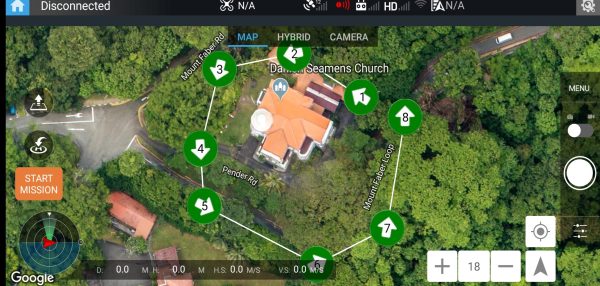
4. In Flight Mode, click on the ‘Start Mission’ button in order to start the mission. Take note : Check your drone status first on the top panel before starting.
5. Ensure all the checklist of the mission are checked in green before sliding the locker to right to start the mission.
How to activate automated flight logging?
Note: Automated flight logging feature is only available in Garuda Plex App (Android).
Automated flight logging feature is activated by default in Garuda Plex App. After you completed a drone flight using Garuda Plex App, simply verify and confirm the flight logging details on the pop-up form.

How do I record a flight manually?
After completing a flight, we recommend that you update your flight history.
-
-
-
-
- Click the Airplane logo in the top right corner of Garuda Plex to access the Drone Operations page. Click +Flight Record.

- Fill in the details accordingly, upload flight log (if available) and submit.

- Click the Airplane logo in the top right corner of Garuda Plex to access the Drone Operations page. Click +Flight Record.
-
-
-
Asset Management
How do I upload the images after a drone operation?
After a drone operation, you can upload all the images captured by the drone to the Library in Garuda Plex. There are three ways to upload images. Follow the steps below to upload your images:
a) From the Home page (via the Home icon in the top right corner of Garuda Plex)
b) From the Projects page (via the Projects tab in the top navigation panel of Garuda Plex)
c) From the Library page (via the Library tab in the top navigation panel of Garuda Plex)
-
-
-
-
- Click Upload.
- Choose a project and then create an album.
- Drag and drop image files from folder / Click Choose Files to select the images.
- Click Start Upload, then click Close after the upload is completed.
- The uploaded images will show in Grid View.

-
-
-
How do I annotate images?
Garuda Plex – Library provides a complete set of annotation tools for you to label and describe particular features in images captured by your drone. To annotate an image:
-
-
-
-
- Select a photo in Grid View or Large Grid.
- Draw a polygon on the area of interest and annotate it with text by selecting the ‘Pen’ icon.


- Edit or delete the annotation by clicking Show Panel on the right side of screen.
- Save the annotation after editing.

-
-
-
How can I process images captured by drones in Garuda Plex?
-
-
-
-
- Upload all the images to the target projects. (We suggest that you upload one set of images at a time because uploading multiple sets of images from multiple tabs on the same computer may cause errors in Garuda Plex.)Please upload images which fulfill the following requirements:
i. JPG format
ii. Geotagged (images with latitude, longitude and altitude)
iii. Contain area of interest in a nadir view
iv. Significant overlap and side-lap (at least 70%)
v. At least 20 images - ‘Make a request‘ to process your datasets into Orthomosaic/3D Models/3D Maps etc. Once your data is processed, you will be able to share, export, annotate and analyse the processed data.
- Upload all the images to the target projects. (We suggest that you upload one set of images at a time because uploading multiple sets of images from multiple tabs on the same computer may cause errors in Garuda Plex.)Please upload images which fulfill the following requirements:
-
-
-
How do I generate reports in Garuda Plex?
???
How do I share a project in Garuda Plex with my client ?
XXX
Drone Regulations
Do I need a permit to fly a drone?
Depending on your location, the local civil aviation authorities may already have regulations in place governing the use of drones. You should be aware of and comply with all applicable local regulations. Please check with your local civil aviation authorities to obtain a copy of the latest drone regulations.
Data Privacy & Security
Will Garuda Robotics disclose my personal information?
Garuda Robotics will not disclose your Personal Information (including personally identifiable information, vehicle and flight information) that we collect on the Service to third parties without your consent. We may disclose information to third parties if you consent to us doing so, as well as in the following circumstances:
-
-
-
-
- when you agree to us sharing your information with other third parties for their own marketing purposes subject to their separate privacy policies;
-
- with third party vendors, consultants, and other service providers who work for Garuda Robotics and need access to your information to accomplish their tasks;
-
- to (i) comply with laws or to respond to lawful requests and legal process, (ii) to protect the rights and property of Garuda Robotics, our agents, customers, and others including to enforce our agreements, policies, and terms of use or (iii) in an emergency to protect the personal safety of Garuda Robotics, its customers, or any person;
-
- in connection with or during negotiation of any merger, financing, acquisition, bankruptcy, dissolution, transaction or proceeding involving sale, transfer, divestiture or disclosure of all or a portion of our business or assets to another company.
-
-
-
For more information, please refer to our Privacy Policy or contact us.